No Knead Bread
on Mar 03, 2023, Updated Feb 28, 2026
This post may contain affiliate links. Please read our disclosure policy.

I posted this No Knead Bread recipe on TikTok on February 12, 2021, not expecting to wake up to 15 million views 🤯. Little did I know that this humble peasant bread, rooted in a history of strength and resourcefulness, would become a 🌎 global sensation, carrying forward my Bapche’s legacy 👵🏼. If you’ve never baked bread before, this is the perfect place to start — it’s simple, beginner-friendly, and surprisingly easy.

Key Takeaways
- The No Knead Bread recipe gained 15 million views on TikTok and honors my family legacy from Bulgaria.
- This recipe requires no kneading and only 5 minutes of active work, making it beginner-friendly.
- You can customize No Knead Bread with variations like gluten-free or sourdough options.
- Serve No Knead Bread with soups, stews, and cheese boards for a delightful pairing.
- Tips include using the correct water temperature for yeast activation and adjusting the dough’s consistency.
Table of Contents
Origins of No Knead Bread
In the heart of Bulgaria 🇧🇬, where a frugal lifestyle was a necessity, basic ingredients—flour, salt, water, and yeast—had our tummies fed and our pockets happy ☺️. My grandma was one of ten siblings so this rustic bread became a lifeline in a very challenging world. The legacy of this no knead bread, called “Selski Hliab” in Bulgarian, persevered through the harsh years of communism when ingredients were scarce but the warmth of freshly baked bread 🥖 was our lifeline.
This bread has been in my family for generations and represents more than just nourishment; it symbolizes the bond between my family and the strength my grandma passed down to us. Though I lost my grandma, who was my soulmate, on November 13, 2020, her memory lives on through our shared moments of laughter, tears, and the simple pleasure of enjoying this bread together. Every time I close my eyes, I can picture her so I hold on to that feeling.
Why You’ll Love No Knead Bread
🥣 No kneading, no stand mixer required. Just a bowl and a spoon — that’s it.
⏲️ Only 5 minutes of active effort. You won’t even get your hands dirty. Mix, cover, and let time do the work.
🍞 A Dutch oven is ideal — but not necessary. It helps create that beautiful crust, but I’ll show you how to make it without one using a baking dish.
👩🍳 Easy to make, without compromising quality. You’ll get a crisp crust and soft, airy crumb that tastes like it came from a bakery.
Nonna’s Tip 🫧
To activate the yeast, dissolve it in warm (not hot) water and let it sit for 5–10 minutes — it should look foamy and bubbly. If nothing happens, it’s best to start fresh.
Variations and Substitutions for No Knead Bread
- Flour Variations: If you’d like a slightly chewier crumb, you can use bread flour instead. For a heartier loaf, substitute up to 50% whole wheat flour and add 1–2 tablespoons of extra water 💧 since whole wheat absorbs more moisture.
- Gluten-Free Option: For all my gluten-free besties, I developed this Gluten Free No Knead Bread with you in mind. Since bread relies on gluten to develop structure, the GF version won’t rise as high as the original and will have a slightly different taste and more density 🥖.
- Yeast Variations: This recipe uses active dry yeast. However, if you prefer instant yeast, you can substitute it in equal amounts and mix it directly into the flour.
- Sourdough Variation: Replace the yeast with ½ cup active sourdough starter and slightly reduce the flour and water to keep the dough balanced. The rise will take longer, and the flavor will be more complex and tangy.
- Flavor Add-Ins: Stir in rosemary and garlic 🧄 before the first rise, fold in chopped olives 🫒, make it extra cheesy, or add 2–3 tablespoons of seeds to the top before baking for extra texture. You can find all of my No Knead Bread recipes below!
More No Knead Bread Recipes

No Knead Olive Bread
6 hrs 5 mins

No Knead Gluten Free Bread
6 hrs 20 mins

No Knead Cheddar Bread
6 hrs 10 mins

No Knead Garlic Bread
4 hrs 10 mins

No Knead Feta Bread
6 hrs 10 mins
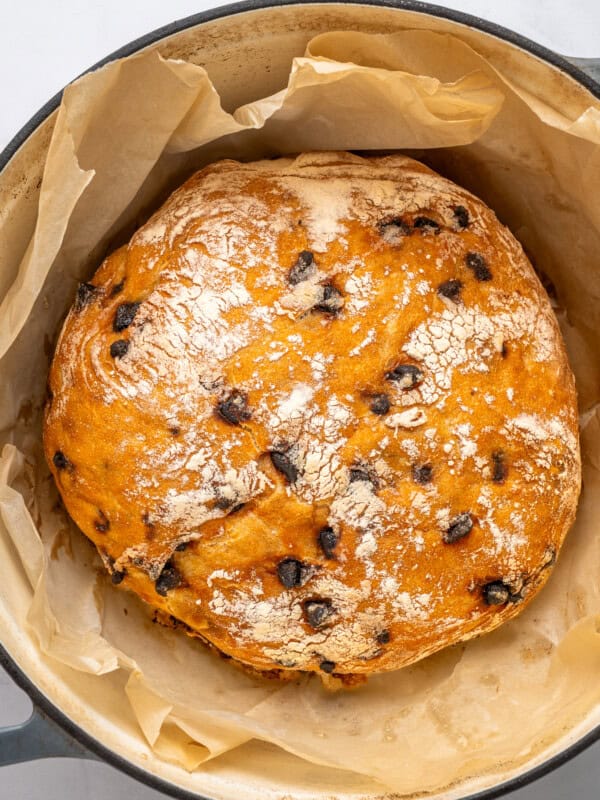
No Knead Chocolate Chip Bread
6 hrs 5 mins
Best Served With
My No Knead Bread pairs wonderfully with a variety of dishes, including soups and stews 🍲, cheese and butter boards 🧀, and more. Some of my favorite soups to enjoy with this bread:
- Pastina Soup
- Greek Lemon Soup
- The Best Lentil Soup
- Hidden Veggie Orzo Soup
- Healthy Cream of Broccoli Soup
- Healthiest Cream of Hidden Veggie Soup
- Hidden Veggie Meatball Soup
- Chicken Noodle Soup
Try it With My Favorite Boards
- Viral Butter Board With Goat Cheese
- Holiday Butter Board
- Holiday Charcuterie Board
- Holiday Cheese Board
Most Common Questions
Maintaining this water temperature range is crucial because it ensures that the yeast activates properly. Water that’s too hot or too cold can hinder yeast activation.
In this traditional recipe, I encourage you to add water gradually until you achieve a very thick and sticky dough, following the “na oko” or “by eye” method.
To test your yeast, add it to warm water. If it doesn’t foam up, you’ll need to start with new yeast. Foaming indicates that the yeast is active and is ready to be added to the flour and salt.
You certainly can. Although this recipe specifically calls for active dry yeast you can also try instant yeast as well.
If the dough is too wet, you can sprinkle in a bit more flour to adjust. Conversely, if it’s too dry, add warm water a little at a time until you have a tacky dough.
Yes, any oven-safe baking dish that can accommodate a loaf of bread will work. For example, a Corning Ware Dish or something similar will do the job.
It’s not necessary. A Dutch oven traps steam, which helps create a crisp crust and strong oven spring. However, you can use a casserole dish or a baking stone with a steam tray as an alternative.
Preheat your Dutch oven in a 450°F (230°C) oven with its lid on, shape the dough, place it inside, bake for 30 minutes with the lid on, then remove the lid and bake for an additional 15-20 minutes until golden brown.
Weighing your flour using a kitchen scale is ideal for accuracy. However, scooping and leveling the flour in a measuring cup can also ensure more precise measurements, helping you achieve the right consistency for the dough.
While I have not explicitly tested it, aluminum foil should work as a substitute for a dish lid.
Yes, you can use 1-1 gluten-free flour for this recipe, or you can make my No-Knead Gluten-Free Bread.
The dough should rest for a minimum of 5 hours, but it’s common to leave it overnight and bake it the following morning, typically at room temperature away from drafts.
In hotter climates, the dough may rise much faster, so I would advise placing it in a cooler room or limiting the rise to a maximum of 2 to 3 hours to prevent over-expansion. Once it doubles or triples in size, it should be baked immediately.
The recipe hasn’t been tested at higher altitudes, so adjustments may be necessary.
The dough should have a thick and sticky consistency. If it’s too dry, add a splash of water at a time until the dough is tacky. Too wet? Add a sprinkle of flour at a time until you reach the desired consistency.
No Knead Bread

Ingredients
- 3 cups all purpose flour, plus more for dusting the counter and top of the bread
- 1 teaspoon salt
- ½ teaspoon active dry yeast , check the expiration; see notes below
- 1 ¾ cups warm water, between 100 and 110 degrees Fahrenheit (37 to 43 degrees Celsius)
- additional flour for dusting the counter plus the top of the bread , no kneading, dust the top and bottom well, gently shape and transfer
Instructions
- In a large mixing bowl, combine the flour, salt, and yeast. Mix with a whisk, wooden spoon, or with clean hands.

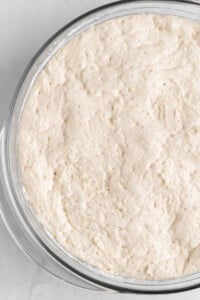
- Add the water and mix with a spatula until you have a sticky dough. Cover the bowl with a clean kitchen towel and let rest at room temperature for at least 5 hours or overnight. Place the bowl of dough away from drafty areas, such as in the microwave, cupboard, or in a cold oven.
- Note: The water must be between 100 and 110 degrees Fahrenheit (37 to 43 degrees Celsius). If the water is too hot or too cold the yeast will not activate.
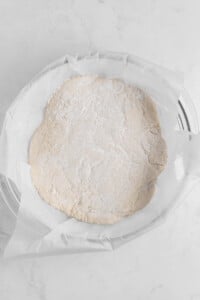
- After the dough has tripled in size, uncover it, and flour the counter. Pour the dough out onto the counter and generously sprinkle the top with flour.
- Note: You do NOT need to knead the dough. You can simply move it around until you have a really nice and soft dough that is no longer sticky and is oval in shape. If the loaf sticks to your hands or the counter, sprinkle on a little more flour.
- Place the loaf into any oven-safe dish lined with parchment paper. Place a lid on the dish, and place the dish in a cold oven (an oven that is NOT preheated).
- Turn the oven on to 450F (230C) once the bread is inside. Bake the bread with the lid on the dish for 30 minutes. After 30 minutes, carefully remove the hot lid from the dish and bake the bread for another 25 to 30 minutes.
- Baking note: The bake time will depend on your oven, so keep an eye on it. Total bake time will be about 1 hour from the moment you place the bread into the cold oven.
- The bread is done once it’s light and golden all over. Let it cool for 5 to 10 minutes and enjoy!

- Storage note: To store leftover bread, let it cool completely, wrap it up in plastic wrap, beeswax wrap, or a clean kitchen towel, and store the bread on the counter. This bread is always best served warm the same day.


Nonna’s Notes
- Flour Variations: If you’d like a slightly chewier crumb, you can use bread flour instead. For a heartier loaf, substitute up to 50% whole wheat flour and add 1–2 tablespoons of extra water 💧 since whole wheat absorbs more moisture.
- Gluten-Free Option: For all my gluten-free besties, I developed this Gluten Free No Knead Bread with you in mind. Since bread relies on gluten to develop structure, the GF version won’t rise as high as the original and will have a slightly different taste and more density 🥖.
- Yeast Variations: This recipe uses active dry yeast. However, if you prefer instant yeast, you can substitute it in equal amounts and mix it directly into the flour.
- Sourdough Variation: Replace the yeast with ½ cup active sourdough starter and slightly reduce the flour and water to keep the dough balanced. The rise will take longer, and the flavor will be more complex and tangy.
- Flavor Add-Ins: Stir in rosemary and garlic 🧄 before the first rise, fold in chopped olives 🫒, make it extra cheesy, or add 2–3 tablespoons of seeds to the top before baking for extra texture. You can find all of my No Knead Bread recipes when you scroll up the post!
My Notes
Nutrition
Nutrition information is automatically calculated, so should only be used as an approximation.


Soft and delicious! Turned out amazing!
This was absolutely delicious, will definitely make it again.
So happy you loved it! ❤️
My first time ever making bread and it turned out amazing!! Can’t thank you enough Senji
Amazing job, Ina! Proud of you!
Hey Sneji
I am excited to make this recipe Tuesday when I make your Turkey for the month. I literally make it every month. Tomorrow I am making your Chicken and potatoes recipe.
Thanks for all of the easy delightful recipes that my husband loves as well ❤️
It’s my pleasure, Alina! I’m so happy you’re enjoying the recipes ❤️.
I’ve been making your no-knead olive bread. It’s delicious. I want to try this one, adding either fresh garlic or garlic herb spice. Do I add it once the dough is mixed and let it rest for 5 hours, or do I add it right before baking the bread?
Hi, Chanie! I’m so happy to hear you’re loving the olive bread! Mix the garlic in with the rest of the ingredients at the beginning, before resting – just like you do with the olive bread. And be sure to come back and let me know how it turns out ❤️!
Hi Sneji, so this is the second time I have made this…I did the traditional round loaf on Halloween and it was gone in a day! So I decided that this time I wanted to try loaf shapes..and it worked! I just used 2 loaf pans and a couple binder clips and made these beautiful things! Next I want to try baguettes! It will be a great addition to the Christmas grazing board! I am also going to take a stab at the gluten-free version for a friend with celiac disease.
Also for anyone wondering about a after crust ..if you want that what you can do..or what I did was butter the loaf when its still warm and then when you store it in your zip lock bag it does get a bit less crunchy..if that’s your thing.
I am having so much fun playing with this recipe and gifting fresh bread to my friends and neighbors who are struggling with food insecurity right now so thank you for sharing your families version. We Italians have a recipe that’s pretty much the same thing..no oil..I just never tried it before now.. much love
Janet, this is wonderful! You are such a blessing to your friends and neighbors. I’m so happy you’re having fun with this recipe and filling a need were you see one. ❤️ I know everyone who tries your bread will feel the love!
I regularly make this recipe and it comes out fantastic every time. I love adding a tablespoon of onion or garlic powder if I’m in the mood for it, and adorning the loaf with some thyme and flaky salt right before popping it in the oven. Thanks so much for sharing it, I think of you and your grandma every time 🙂
Thank you, Katie! ❤️
Well, it’s in the oven . 7 minutes to go before lid removal. I really don’t trust my oven so we will see
I hope it works because since cancer treatments I haven’t been strong enough to kneed bread. Sounds silly doesn’t it? Well try opening a jar ☺️. Plus I have low iron anemia.
If I made a mistake with this recipe it may have been dumping in all the warm water at once. It rose beautifully but was really wet. Probly took another 4-3d cup to get it somewhat manageable. I live in Oregon. There is a lot of dampness here and probably affects the flour too. Will update y’all!!
L
Hi, Sherri! I’m so happy you were able to try this recipe. Please let me know how it turned out and be well ❤️.
Thank you for sharing this recipe. We loved it.
I’m so happy you loved it, Silvya ❤️!
I made this recipe for the first time today, and i really enjoyed it. My dough did double in size, but it didn’t rise in the oven. It came out more like a flatter bread. I couldn’t really form it as it was sticky and stuck to my board even though i added more flour. None the less the taste came out well. Will definitely be trying it again
Thank you for trying this recipe, Grace! I can’t wait to see how your next loaf turns out! ❤️
I’ve been making this recipe for a few years now and it’s successful every time I used to make it round in a loaf pan, but I don’t like as much dough as I do the crust so now I’ve make it in the form of a baguette, and we love it.
I have to tell you Sneji that every time I make people are dumbfounded that I made such a delicious homemade bread and always call me for the recipe or if I go to peoples houses that is their request from me.
It really does depend on the weather or the temperature inside your house how the bread comes out I cook it for 30 minutes on a baguette form covered with parchment and foil and then I uncover it and sometimes it needs more than 30 minutes uncovered even in the shape of a baguette because we like it very crunchy.
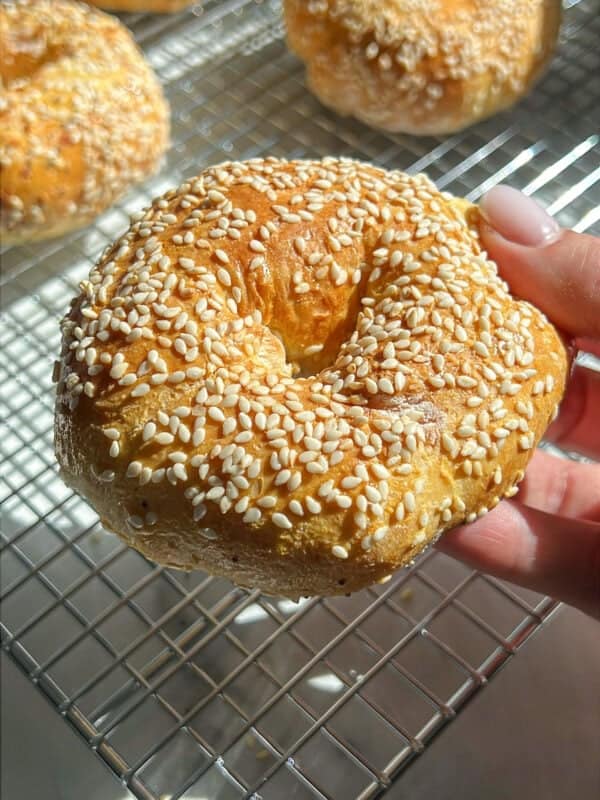
Today when I made it, I added sesame seeds mix mixed with anise seeds which are a little bit liquoricey into the dry mix before the water and it was absolutely delicious.
Sometimes the bottom doesn’t get crunchy so I take it out and I put it straight onto the oven rack.
I’ve tried other artisan bread recipes, but yours is the easiest, least time-consuming and the most delicious.
I love this, Valerie! Your baguette looks amazing – and I’m sure it smells amazing with the anise added in! Thank you sooo much for sharing ❤️.