No Knead Gluten Free Bread
on Nov 06, 2022, Updated Oct 24, 2023
This post may contain affiliate links. Please read our disclosure policy.

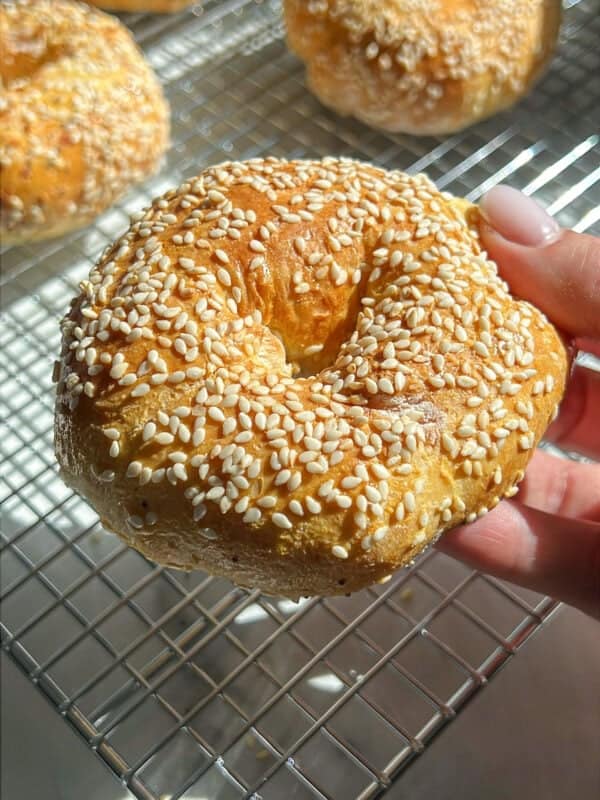
If you can’t have dairy or 🌾 gluten, I have you covered with my easy No Knead Gluten-Free Bread. This bread is fluffy on the inside and crispy on the outside. This is what all gluten-free bread dreams are made of. Even if you are not gluten-free.
I highly suggest you try this bread because it’s actually softer in texture than my other no knead bread recipes. When I first made this recipe, I didn’t tell anyone that it was gluten-free, and my family couldn’t tell the difference. This is hands down the best gluten-free bread you will ever try.

Why You’ll Love No Knead Gluten Free Bread
Just because your diet may require you to make gluten-free bread (for yourself or your guests) doesn’t mean you should have to suffer! This gluten-free bread is not only easy to make because of simple ingredients and steps, but also incredibly tasty.
If you need another reason to love this 🍞 bread, look no further than its flaky and crispy crust with its soft inside.
Even more, you don’t have to be worried about a ⏲️ long rise time with this bread, because it only requires 5 hours of resting, so the dough can be prepared in the morning and then baked and ready before dinner in the evening! So easy!
How To Prepare
✨ First, activate the yeast by combining the warm 💦 water, sugar, and active dry yeast in a bowl. Stir and wait for 5 minutes to ensure activation; make sure the water is lukewarm.


🥣 In a separate large bowl, mix the gluten-free flour and 🧂 salt.
🥄 Slowly incorporate the activated yeast mixture, stirring until you achieve a thick, sticky dough.
😴 Cover the dough and let it rest at room temperature for 5 hours.
👩🍳 After the dough rises, transfer it to a floured surface, shape it into an oval, and place it in a baking dish lined with parchment paper. Cover the dish with a lid or doubled-up aluminum foil.


🥶 Put the dish in a 🧊 cold oven, set the temperature to 450F, and bake for 40 minutes (do not preheat your oven).
🥧 After the loaf has cooked for 40 minutes, uncover the bread and bake for an additional 30 minutes or less, depending on your oven, until it’s light and golden.
🍞 Let the bread ❄️ cool for 5 to 10 minutes, and then enjoy your homemade gluten-free bread.
Nonna’s Tip 🍞
Make sure the yeast is not expired. You can always add the yeast to warm water and let it foam up. When it foams up, it’s active and ready to be used. If it doesn’t foam up, start this step again.
Substitutions and Variations for No Knead Gluten Free Bread
This No Knead Gluten-Free Bread has lots of options for add-ins. I have only tried Caputo’s Gluten-Free flour so you will have to experiment if you use a different brand.
- You can add herbs 🌿 like rosemary, thyme, or spices such as garlic powder or onion powder to the dough.
- Sprinkle sesame seeds, poppy seeds, or chopped nuts (like walnuts or sunflower seeds) on top of the bread before baking for added texture and flavor.
- Experiment with different shapes – you could make rolls, 🥖 baguettes, or even stuffed bread with your favorite fillings.

Best Served With
My No Knead Gluten-Free Bread pairs wonderfully with a variety of dishes, including soups and stews, cheese and butter boards, and more. Some of my favorite soups to enjoy with this bread:
- Pastina Soup
- Greek Lemon Soup
- The Best Lentil Soup
- Hidden Veggie Orzo Soup
- Healthy Cream of Broccoli Soup
- Healthiest Cream of Hidden Veggie Soup
- Hidden Veggie Meatball Soup
- Chicken Noodle Soup

Try it With My Favorite Boards
- Viral Butter Board With Goat Cheese
- Holiday Butter Board
- Holiday Charcuterie Board
- Holiday Cheese Board
Other No Knead Recipes
If you like this no knead bread, try some of my others:
- No-Knead Cheddar Bread
- My Viral No-Knead Peasant Bread
- Grandma’s No-Knead Olive Bread
- No-Knead Foccacia
Common Questions
I use a Corning Ware Dish for this recipe. You can feel free to use any baking dish that you have on hand as long as the bread fits in it.
I use Caputo Fioreglut (1kg) – Italian Gluten Free Flour. It’s the best flour out of any others I have tried. You can absolutely try another type of gluten-free baking flour, but I cannot guarantee the same quantities or results.
Maintaining this water temperature range is crucial because it ensures that the yeast activates properly. Water that’s too hot or too cold can hinder yeast activation.
In this traditional recipe, I encourage you to add water gradually until you achieve a very thick and sticky dough, following the “na oko” or “by eye” method.
To test the yeast’s activity, add it to warm water. If it doesn’t foam up, you’ll need to start with new yeast. Foaming indicates that the yeast is active and is ready to be added to the flour and salt.
If the dough is too wet, you can sprinkle in a bit more flour to adjust. Conversely, if it’s too dry, add warm water a little at a time until you have a tacky dough.
Yes, due to the material you will have to preheat the Dutch oven in a 450°F (230°C) oven with its lid on, shape the dough, place it inside, bake for 30 minutes with the lid on, then remove the lid and bake for an additional 15-20 minutes until golden brown.
You certainly can, although this recipe specifically calls for active dry yeast you can also try instant yeast as well, but I have not tried making this bread with any other type of yeast.
This method ensures more precise measurements, helping you achieve the right consistency for the dough.
While I have not explicitly tested it, using a doubled-up piece of aluminum foil should work as a substitute for a dish lid.
The dough should rest for a minimum of 5 hours, but it’s common to leave it overnight and bake it the following morning. Let the dough rest at room temperature away from drafts.
In hotter climates, the dough may rise much faster, so I would advise placing it in a cooler room or limiting the rise to a maximum of 2 to 3 hours to prevent over-expansion. Once it doubles or triples in size, it should be baked immediately.
The recipe hasn’t been tested at higher altitudes, so adjustments may be necessary.
The dough should not be watery or dry; it should have a thick and sticky consistency.
I use Redmond Real Salt, please note that depending on the salt you use, your dish may be less or more salty. Salt is always to taste. Always taste and adjust as you cook.
No-Knead Gluten-Free Bread

Equipment
Ingredients
Activate The Yeast
- 1.5 cups warm water
- 1 teaspoon sugar
- ½ teaspoon active dry yeast
Dry Ingredients
- 3 cups gluten-free flour , I used Caputo
- 1 teaspoon salt
Instructions
- Note: I have only tried Caputo's Gluten-Free Flour so you will have to experiment if you use a different brand. If the yeast does not activate, start that step all over.
- Start by adding the first three ingredients to a bowl and stir. Wait five minutes and if the yeast does not activate you will have to re-do this step. Make sure the water is warm. If it's too hot or too cold, the yeast may not activate. Water should be lukewarm.
- Add the flour and salt to a separate big bowl and stir. Slowly add in the activated yeast mixture and stir until you get the right consistency. You should have a thick sticky dough; it shouldn’t be too wet or too dry.
- Let it rest covered for 5 hours at room temperature away from drafts. Once the dough has risen, flour the counter and pour out the dough. Flour the top of the dough and shape it. No-kneading, just shape it into an oval even dough ball.
- Transfer into ANY baking dish lined with parchment paper and put the lid on. If you don't have a lid, add double foil on top instead.
- Put the bread in the cold oven, turn the oven to 450F and bake for 40 minutes. DO NOT pre-heat the oven. Put the bread in, turn the oven on, and start the timer for 40 minutes right away.
- After 40 minutes, uncover it and bake for another 30 minutes or less depending on the oven. The bread is done once it’s light and golden all over.
- Let the bread cool for 5 to 10 minutes and dig in! Enjoy.
Nonna’s Notes
My Notes
Nutrition
Nutrition information is automatically calculated, so should only be used as an approximation.


I made this recipe numerous times with these changes. I use 1 full package of Quick Rise yeast and King Arthur Flour; 2cups 1-1 flour plus 1cup bread flour. It is a dense bread but perfect to use for Spinach Artichoke Dip bowls. It comes out looking just like the pictures.
Also I have used for my Cinnamon Raisin Rolls with perfection. Just add 2-3 Tablespoons on a sweetener like honey or sugar to to the yeast mix just before adding to the flour then rise. Yummy. Enjoy
Terri, this feedback is AMAZING and sooooo helpful! Thank you ☺️
Hi I am going to try and make your recipe
I cannot find caputo flour so I am using Bob’s RedMill flour gluten free.
Will I have a problem with it? And should I double the recipe?
Thank you
Hi Connie, so based on all of my reviews people have had success with cup 4 cup and King Arthurs gluten-free flour. I haven’t tried Bob’s red mill for this recipe. Caputo is still my favorite.
Hi, looks very easy. We have to go to gluten free for family health issues. This recipe is for gluten free regular flour right,? Can I use gluten free bread flour? Will be any change in the water?
Thanks
Hi Pat, correct, this recipe uses gluten-free flour. I use Caputo Fioreglut (1kg) – Italian Gluten Free Flour. It’s the best flour out of any others I have tried. You can absolutely try another type of gluten-free baking flour, but I cannot guarantee the same quantities or results.
Hello from Canada! I should have watched the video before I decided that my GF yeast was no good. I was expecting it to foam up. Anyhow bought new yeast and followed instructions on the side of the jar to activate yeast (Fleishmans 2 1/4 tsp per 1/4 c water plus 1 tsp sugar) I added extra water after activation before adding it to flour and followed recipe. It did turn out but too yeasty tasting and a bit dense. Now that I have seen the video I know what the yeast should look like and I will try it your way tomorrow. I expect that it will take me some time to perfect this but even so it already tastes better than we can buy at the store. 🙂 PS I bought the Caputo on Amazon- pricey but I love bread and my daughter has Celiac so I am trying to compromise to make everyone happy!!
Hi Holly — I hope your second go around is a success 🤞
What brand of yeast are you using with this? Fleishman’s (North America) yeast will not activate unless you follow the instructions on the side of the jar. I am wondering what you are using to make this recipe work? Thanks!
Hi Holly! I use Fleishman’s active dry yeast and I don’t activate it prior to adding it in (you can just to be safe though)
Warning! Caputo Gluten Free Flour contains wheat starch (as does some Schar products) so although it is considered gluten free (about 5 ppm) you might have a reaction if you are a sensitive celiac. No for us! Back to the kitchen to start again.
Made this bread yesterday, it looked good, but is like a rock. Followed the Recipe, to me it seemed like it did not rise enough. I see that you use Caputo flour, we do not have this here in Australia.
Hi there, thanks for the comment. There are a few reasons why your no-knead bread might have turned out hard:
Over-Proofing:
Indication: The dough may have risen too much and then collapsed, resulting in a dense, hard loaf.
Solution: Keep a close eye on the dough during its rise. It should double in size, but not more. If it’s taking too long, consider putting it in the refrigerator to slow down the process.
2. Under-Proofing:
Indication: The dough may not have risen enough, leading to a dense, undercooked loaf.
Solution: Ensure the dough has risen to the desired size and has a bubbly texture before baking. You might need to adjust the proofing time or temperature.
3. Overbaking:
Indication: The bread may be dry and hard, especially on the crust.
Solution: Check the internal temperature of the bread. It should reach around 200-210°F (93-99°C). If it’s too high, the bread might be overbaked. Consider reducing the baking time slightly.
4. Incorrect Flour:
Indication: The bread may be dense and tough.
Solution: use a great quality gluten-free flour, in my case CAPUTO is the best.
5. Insufficient Hydration:
Indication: The dough may be dry and crumbly.
Solution: Ensure you’re using the correct amount of water in your recipe. The dough should be slightly sticky, but not wet.
Hey! Making this as a gift for a GF friend of mine. Does this loaf freeze well? & if so, what’s the process to thaw or reheat?
Hi Caroline, unfortunately I have not tried freezing this loaf 🙁 hope you can still make it.
Can you put in fridge overnight to bake the following day? Or does it have to rise in a warm spot? I bake often but this will be my first try at gluten free!!
Hi Megan, I don’t recommend refrigerating the dough. It needs warmth to rise. Happy baking! 💗🙏🍞
I’m giving this five stars!! This is the first time I have ever made bread and my suggestion if this is you: plan on making 2 to 4 batches consecutively over a couple days to perfect it. Everyones oven is different, and everyone’s gluten-free flour is going to be different. As a note, I am in the US, and used instant dry yeast. I didn’t know my yeast was instant on the first round so I just thought I had bad yeast.
Anyway here’s what is working for me:
– Double or triple the amount of yeast
– Double the salt
– If using instant yeast, mix all dry ingredients together with a whisk and make sure your water is at least 110 degrees f before adding (can be up to 120) – I have had to double the amount of water each time.
– let rise in front of a heater or in a spot that’s at least 80 degrees. I let mine rise for about two hours.
– you’re gonna have to use your instincts to determine when it’s done… I am still perfecting the cook time but what I’ll say is that my GF flour needs to be cooked for significantly longer than the recipe calls for.
Thanks Alice. Mine came out as a rock on the outside n a bit doughy on the inside.. I’ll try it yet again..
I am making this for the first time for my daughter. I’m just seeing your ingredients. I did not double mine. I just used the ingredients above. I’m hoping it comes out good.
I cooked the bread exactly as your recipe states. It has come out hard as a rock on the outside, the parchment paper has stuck to the base and the inside is chewy. What have I done wrong??
Hi Bessy, are you sure you used parchment paper? Im only asking because parchment paper shouldn’t stick. If you used WAX paper by accident (which is not oven proof) it will definitely stick. The bread should be light and fluffy if you used the CAPUTO flour that I used in this recipe. Did you use another brand? if so, I have not tested this bread with other brands of GF flour and that maybe the case here.
Meant to say too, that’s 5 stars from me. Thanks for doing all that testing and making the recipe available.
Your tip to wait till the bread cools fully before cutting or breaking it is also a good one.
Aww thanks Freya! So kind 🥹🥰