No Knead Gluten Free Bread
on Nov 06, 2022, Updated Oct 24, 2023
This post may contain affiliate links. Please read our disclosure policy.

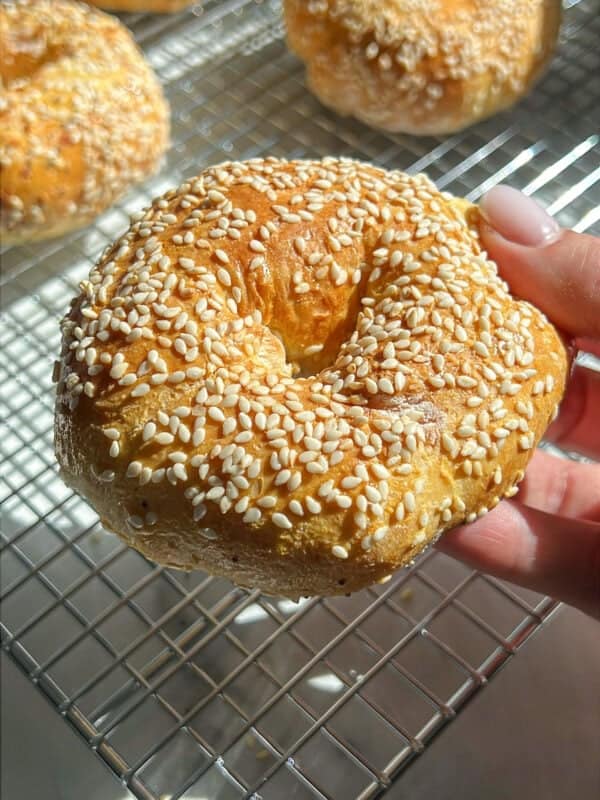
If you can’t have dairy or 🌾 gluten, I have you covered with my easy No Knead Gluten-Free Bread. This bread is fluffy on the inside and crispy on the outside. This is what all gluten-free bread dreams are made of. Even if you are not gluten-free.
I highly suggest you try this bread because it’s actually softer in texture than my other no knead bread recipes. When I first made this recipe, I didn’t tell anyone that it was gluten-free, and my family couldn’t tell the difference. This is hands down the best gluten-free bread you will ever try.

Why You’ll Love No Knead Gluten Free Bread
Just because your diet may require you to make gluten-free bread (for yourself or your guests) doesn’t mean you should have to suffer! This gluten-free bread is not only easy to make because of simple ingredients and steps, but also incredibly tasty.
If you need another reason to love this 🍞 bread, look no further than its flaky and crispy crust with its soft inside.
Even more, you don’t have to be worried about a ⏲️ long rise time with this bread, because it only requires 5 hours of resting, so the dough can be prepared in the morning and then baked and ready before dinner in the evening! So easy!
How To Prepare
✨ First, activate the yeast by combining the warm 💦 water, sugar, and active dry yeast in a bowl. Stir and wait for 5 minutes to ensure activation; make sure the water is lukewarm.


🥣 In a separate large bowl, mix the gluten-free flour and 🧂 salt.
🥄 Slowly incorporate the activated yeast mixture, stirring until you achieve a thick, sticky dough.
😴 Cover the dough and let it rest at room temperature for 5 hours.
👩🍳 After the dough rises, transfer it to a floured surface, shape it into an oval, and place it in a baking dish lined with parchment paper. Cover the dish with a lid or doubled-up aluminum foil.


🥶 Put the dish in a 🧊 cold oven, set the temperature to 450F, and bake for 40 minutes (do not preheat your oven).
🥧 After the loaf has cooked for 40 minutes, uncover the bread and bake for an additional 30 minutes or less, depending on your oven, until it’s light and golden.
🍞 Let the bread ❄️ cool for 5 to 10 minutes, and then enjoy your homemade gluten-free bread.
Nonna’s Tip 🍞
Make sure the yeast is not expired. You can always add the yeast to warm water and let it foam up. When it foams up, it’s active and ready to be used. If it doesn’t foam up, start this step again.
Substitutions and Variations for No Knead Gluten Free Bread
This No Knead Gluten-Free Bread has lots of options for add-ins. I have only tried Caputo’s Gluten-Free flour so you will have to experiment if you use a different brand.
- You can add herbs 🌿 like rosemary, thyme, or spices such as garlic powder or onion powder to the dough.
- Sprinkle sesame seeds, poppy seeds, or chopped nuts (like walnuts or sunflower seeds) on top of the bread before baking for added texture and flavor.
- Experiment with different shapes – you could make rolls, 🥖 baguettes, or even stuffed bread with your favorite fillings.

Best Served With
My No Knead Gluten-Free Bread pairs wonderfully with a variety of dishes, including soups and stews, cheese and butter boards, and more. Some of my favorite soups to enjoy with this bread:
- Pastina Soup
- Greek Lemon Soup
- The Best Lentil Soup
- Hidden Veggie Orzo Soup
- Healthy Cream of Broccoli Soup
- Healthiest Cream of Hidden Veggie Soup
- Hidden Veggie Meatball Soup
- Chicken Noodle Soup

Try it With My Favorite Boards
- Viral Butter Board With Goat Cheese
- Holiday Butter Board
- Holiday Charcuterie Board
- Holiday Cheese Board
Other No Knead Recipes
If you like this no knead bread, try some of my others:
- No-Knead Cheddar Bread
- My Viral No-Knead Peasant Bread
- Grandma’s No-Knead Olive Bread
- No-Knead Foccacia
Common Questions
I use a Corning Ware Dish for this recipe. You can feel free to use any baking dish that you have on hand as long as the bread fits in it.
I use Caputo Fioreglut (1kg) – Italian Gluten Free Flour. It’s the best flour out of any others I have tried. You can absolutely try another type of gluten-free baking flour, but I cannot guarantee the same quantities or results.
Maintaining this water temperature range is crucial because it ensures that the yeast activates properly. Water that’s too hot or too cold can hinder yeast activation.
In this traditional recipe, I encourage you to add water gradually until you achieve a very thick and sticky dough, following the “na oko” or “by eye” method.
To test the yeast’s activity, add it to warm water. If it doesn’t foam up, you’ll need to start with new yeast. Foaming indicates that the yeast is active and is ready to be added to the flour and salt.
If the dough is too wet, you can sprinkle in a bit more flour to adjust. Conversely, if it’s too dry, add warm water a little at a time until you have a tacky dough.
Yes, due to the material you will have to preheat the Dutch oven in a 450°F (230°C) oven with its lid on, shape the dough, place it inside, bake for 30 minutes with the lid on, then remove the lid and bake for an additional 15-20 minutes until golden brown.
You certainly can, although this recipe specifically calls for active dry yeast you can also try instant yeast as well, but I have not tried making this bread with any other type of yeast.
This method ensures more precise measurements, helping you achieve the right consistency for the dough.
While I have not explicitly tested it, using a doubled-up piece of aluminum foil should work as a substitute for a dish lid.
The dough should rest for a minimum of 5 hours, but it’s common to leave it overnight and bake it the following morning. Let the dough rest at room temperature away from drafts.
In hotter climates, the dough may rise much faster, so I would advise placing it in a cooler room or limiting the rise to a maximum of 2 to 3 hours to prevent over-expansion. Once it doubles or triples in size, it should be baked immediately.
The recipe hasn’t been tested at higher altitudes, so adjustments may be necessary.
The dough should not be watery or dry; it should have a thick and sticky consistency.
I use Redmond Real Salt, please note that depending on the salt you use, your dish may be less or more salty. Salt is always to taste. Always taste and adjust as you cook.
No-Knead Gluten-Free Bread

Equipment
Ingredients
Activate The Yeast
- 1.5 cups warm water
- 1 teaspoon sugar
- ½ teaspoon active dry yeast
Dry Ingredients
- 3 cups gluten-free flour , I used Caputo
- 1 teaspoon salt
Instructions
- Note: I have only tried Caputo's Gluten-Free Flour so you will have to experiment if you use a different brand. If the yeast does not activate, start that step all over.
- Start by adding the first three ingredients to a bowl and stir. Wait five minutes and if the yeast does not activate you will have to re-do this step. Make sure the water is warm. If it's too hot or too cold, the yeast may not activate. Water should be lukewarm.
- Add the flour and salt to a separate big bowl and stir. Slowly add in the activated yeast mixture and stir until you get the right consistency. You should have a thick sticky dough; it shouldn’t be too wet or too dry.
- Let it rest covered for 5 hours at room temperature away from drafts. Once the dough has risen, flour the counter and pour out the dough. Flour the top of the dough and shape it. No-kneading, just shape it into an oval even dough ball.
- Transfer into ANY baking dish lined with parchment paper and put the lid on. If you don't have a lid, add double foil on top instead.
- Put the bread in the cold oven, turn the oven to 450F and bake for 40 minutes. DO NOT pre-heat the oven. Put the bread in, turn the oven on, and start the timer for 40 minutes right away.
- After 40 minutes, uncover it and bake for another 30 minutes or less depending on the oven. The bread is done once it’s light and golden all over.
- Let the bread cool for 5 to 10 minutes and dig in! Enjoy.
Nonna’s Notes
My Notes
Nutrition
Nutrition information is automatically calculated, so should only be used as an approximation.


The yeast ratio is off I had to triple the amount of yeast for it to work at all.
Hi Sam, I’m glad you got the recipe to work for you!
I tried doing this recipe twice. Both times it has turned out wrong. It looked pretty coming out, but it was small, very dense, and heavy. It’s almost not edible because of how thick it is. My main concern is the slurry. The ratios are off to the point where it’s not a sticky dough. It was very dry, so therfore, it couldn’t grow while proofing. For the second one, I tried changing up a the measurements to see if I could make it better. Nope. I watched your videos, and judging from what others have said as well in the comments, the recipe doesn’t work.
Hi Drew,
It works perfectly for me using Caputo flour (I have not tried other brands) but I will retest this recipe with different measurements and brands and hopefully make it better for everyone ❤️ Thank you for your honest feedback and I am sorry it did not work out. I hope you try other recipes on my site. Thank you kindly
It rose nicely. I the pan ok. Covered, turned oven to 450 baked and came out flat as a pancake Like a paving stone. So sad.
Bummer! Did you check if your yeast is active?
Best GF bread recipe!!! Love that it has the same texture as regular bread and does not taste GF. It smelled great in the oven too! I tried proofing twice, and I had to add I little more yeast to make it work. Thank you and will be making this again!
Thank you EDL! So glad it’s a hit!
I think there is a typo in the water: yeast ratios. I’ve tried the caputo yeast and fleischmann’s. Neither of them activate at this ratio. However, they both activate with the 1/2 teaspoon of yeast using much less water. Please advise. I am dying for some really good bread 😊
Hi Angie,
mine worked perfectly but please feel to add more and adjust, I will retest the recipe again with different quantities and make sure to revise the recipe if needed.
My recipe tasted great and the texture was good however it was like superglued to the bottom of my Dutch oven and unfortunately broke in half trying to get out of it. Can I butter the bottom or use parchment paper while baking?
Hi Kelly! Please line your Dutch oven with parchment paper! Very important step to prevent sticking. So glad the bread came out well otherwise 👏💗
Something about the amount of yeast to water and sugar is off. I can’t even get my yeast to activate with these amounts. Are you sure wheat you have is still accurate?
Followed the recipe to the letter and it did not work for me at all …
I dont think the yeast is enough for that amount of flour.
I followed the recipe exactly. The bread did not rise at all (even though it was in a warm moist environment). 1/2 tsp of yeast is not nearly enough. I will try to fix the dough by adding more bloomed yeast and a bit more flour to make a softer dough and let it rise again..
Unless my modifications improve the product, I would not make again and waste the ingredients….
Hi Gwen, I am so sorry to hear that and if there’s anything I can do to help, please let me know as I would love this recipe to work for you. I do think the flour that I use works perfectly for this recipe which is CAPUTO which works perfect every single time.
Can I add some sour dough starter to your Gf bread no nead recipe?
Hi Patty,
I have not tried making this recipe with sourdough starter. Please let us know how it goes if you try it.
Patty, how did it come out with the sourdough starter? How much did you use and how much water? Dying for a good GF sourdough recipe!
Same thing happened to me today 😞
I am trying this recipe for no knead gluten free bread today and cannot wait to eat it tonight. Thank you for your recipe and I shall rate it tomorrow 🙏
This is the best gluten free bread I have ever made. It’s so crusty on the outside but soft am delicious on the inside. I will definitely be making this more often. Thank you for the recipe.
Aww thanks Anne! This means so much to me ❤️
Hi Anne, my yeast is not activating with those measurements in the recipe. Did you have to adjust it? If so, can you please let me know what you did because I’ve been trying for three days to get my yeast to activate. I’ve tried two different brands and it’s not working.