French Omelette
on Jul 16, 2022, Updated Aug 19, 2025
This post may contain affiliate links. Please read our disclosure policy.

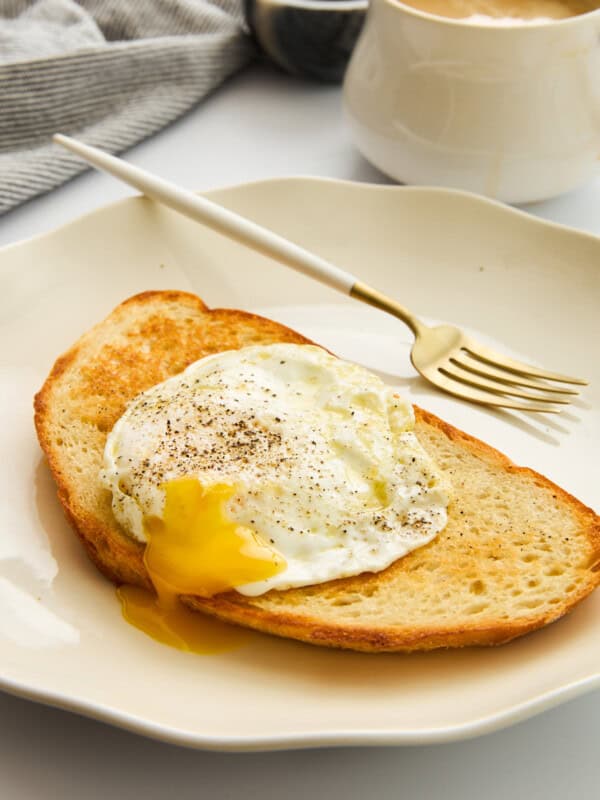
This is the easiest, creamiest, cheesy French Omelette. If you are tired of boring and dry eggs, this is the recipe you need. The truth is, as simple as eggs are to make, people really struggle to cook them well 🥚. Every time I post my eggs on social media I get a ton of requests on how I make them so smooth, tender, and delicious. I’ve created this recipe tutorial to help you become an egg master 🧑🍳. The techniques in this recipe are game-changers! Eggs, in my opinion, should be creamy, light, airy, and cheesy, so this recipe is my exact method to achieving that. Here, we take our egg education from the French, who have mastered the perfect egg 🇫🇷.
Why You’ll Love this French Omelette Recipe
The French Omelette recipe uses a classic technique for making a delicate, fluffy, and creamy omelet. You will find that by whisking the eggs for 60 seconds and then slowly cooking them over low heat your eggs will come up perfect every time. Of course, in true TMN fashion, I had to add some cheese to my version; call it a French Omelette with Cheese, if you will 🧀. The results speak for themselves: there are NO dry eggs ever around here! Instead, only fluffy, creamy eggs that are perfectly cheesy every bite.
How to Prepare
🧈 Start by placing a pan on medium-low heat, add some butter and then let it melt.
🥣 In a separate bowl whisk 2-3 eggs with a fork for about a minute.
🥚 Now, add the eggs to the pan and then gently move them around with a spatula for a few seconds.
🌀 Lift the pan off the heat and then move it around to redistribute the rest of the loose eggs.
🔥 Place the pan back on the heat and let the eggs set a bit.
🧀 Next, add the grated cheese on top and then a pinch of salt (if using).
😋 When the sides can easily lift, use a spatula to gently fold the eggs starting from one side just like you would fold a crêpe. Serve and enjoy your French cheese omelette!
Nonna’s Tip 🥚
The more you whisk your eggs, the lighter and more airy they will be. I like whisking them for about 60 seconds.

Variations and Substitutions for French Omelette
- The cheese in this recipe is usually salty enough for me but feel free to add a pinch of salt and pepper if you wish 🧂.
- I used Manchego cheese here, but you can experiment with your favorite to make a personalized Cheese Omelette: cheddar, mozzarella, goat cheese, feta or a non-dairy alternative 🧀.
- Feel free to add fresh herbs, such as finely chopped basil, oregano, or thyme leaves, or chopped chives.
Similar Recipes

Air Fryer Hard Boiled Eggs
13 mins

Viral Feta Fried Eggs
10 mins

Tofu Scramble
13 mins

How to Poach Eggs
6 mins
Over Medium Eggs
5 mins
Best Served With
- Serve this French Omelette with Cheese with your favorite breakfast protein such as turkey bacon, my Breakfast Sausage Recipe, or pork bacon 🥓 .
- A fresh side salad like my Greek Feta Salad or Simple Green Salad goes really well with a cheese omelette 🥗.
- Serve this French Omelette with homemade pancakes or French toast for brunch .
French Omelette

Equipment
Ingredients
- 1 tablespoon butter
- 2 eggs
- 1 tablespoon shredded Manchego cheese, or any cheese you like
- salt, optional, to taste
- black pepper, optional, to taste
Instructions
- In a pan on medium-low heat add the butter and let it melt. In a bowl whisk the eggs for about 60 seconds. The more air we whisk into them, the better. I usually use a fork to do this with until they are nice and airy.
- Add the eggs to the pan and gently move them around with a spatula for a few seconds. As you move them around, you should see egg curds begin to form.
- You can lift the pan off the heat and move it around to redistribute the rest of the loose eggs (as per my video below). Place the pan back on the heat and let the eggs set a bit, undisturbed.
- Add the grated cheese and a pinch of salt, if using. When the sides of the omelette can easily be lifted without breaking, you can begin to gently fold the eggs, starting from one side just like you would fold a crêpe. You can fold them all the way starting from one end all the way to the other end or you can fold each side towards the middle starting from opposite sides if it’s easier for you. Serve and enjoy.
Nonna’s Notes
- Easy to Scale: You can easily use this recipe to make a 3 or 4 egg omelette. Simply add a bit more cheese and account for a slightly longer cook time.
- Serve a Crowd: If you’re making more than one omelette, you can keep individual omelettes warm on plates in the oven. Put your oven on the lowest setting possible (usually about 170F / 80C) to keep the food warm.
- Make it Shine: Some chefs like to finish off their French Omelettes by spreading a light layer of butter over the fully cooked omelette. It gives the eggs a nice “restaurant finish” look and adds a bit more flavor.
- Egg Quality: Seek out the best quality eggs you can find. Local, organic, and free range all make a difference in the taste and nutritional quality of eggs.
My Notes
Nutrition
Nutrition information is automatically calculated, so should only be used as an approximation.
Common Questions
The more you whisk your eggs, the lighter and more airy they will be. I like whisking them for about 60 seconds.
Cook the eggs over medium-low heat to help make sure they don’t dry out or get too much color.
Experiment with different cheese options, such as crumbled feta, goat cheese, Swiss, grated mozzarella, or cheddar.
Fresh herbs such as parsley, chives, basil, cilantro, or dill can be chopped and added to the egg mixture or used as a garnish.
Experiment by adding your favorite veggies, such as mushrooms, peppers, chives, onion, zucchini, or asparagus (raw or sauteed).
American Omelettes are often thick and cooked quickly over high heat. The eggs are fully cooked throughout. They can taste a bit chewy. A French Omelette is cooked low and slow, so the eggs first firm up as curds, and then form a fully cooked outer layer. This results in a thinner, more delicate, and creamier omelette.


Thank you for the tutorial!
The creamiest and cheesiest eggs! Perfect recipe and tutorial! Thanks!